
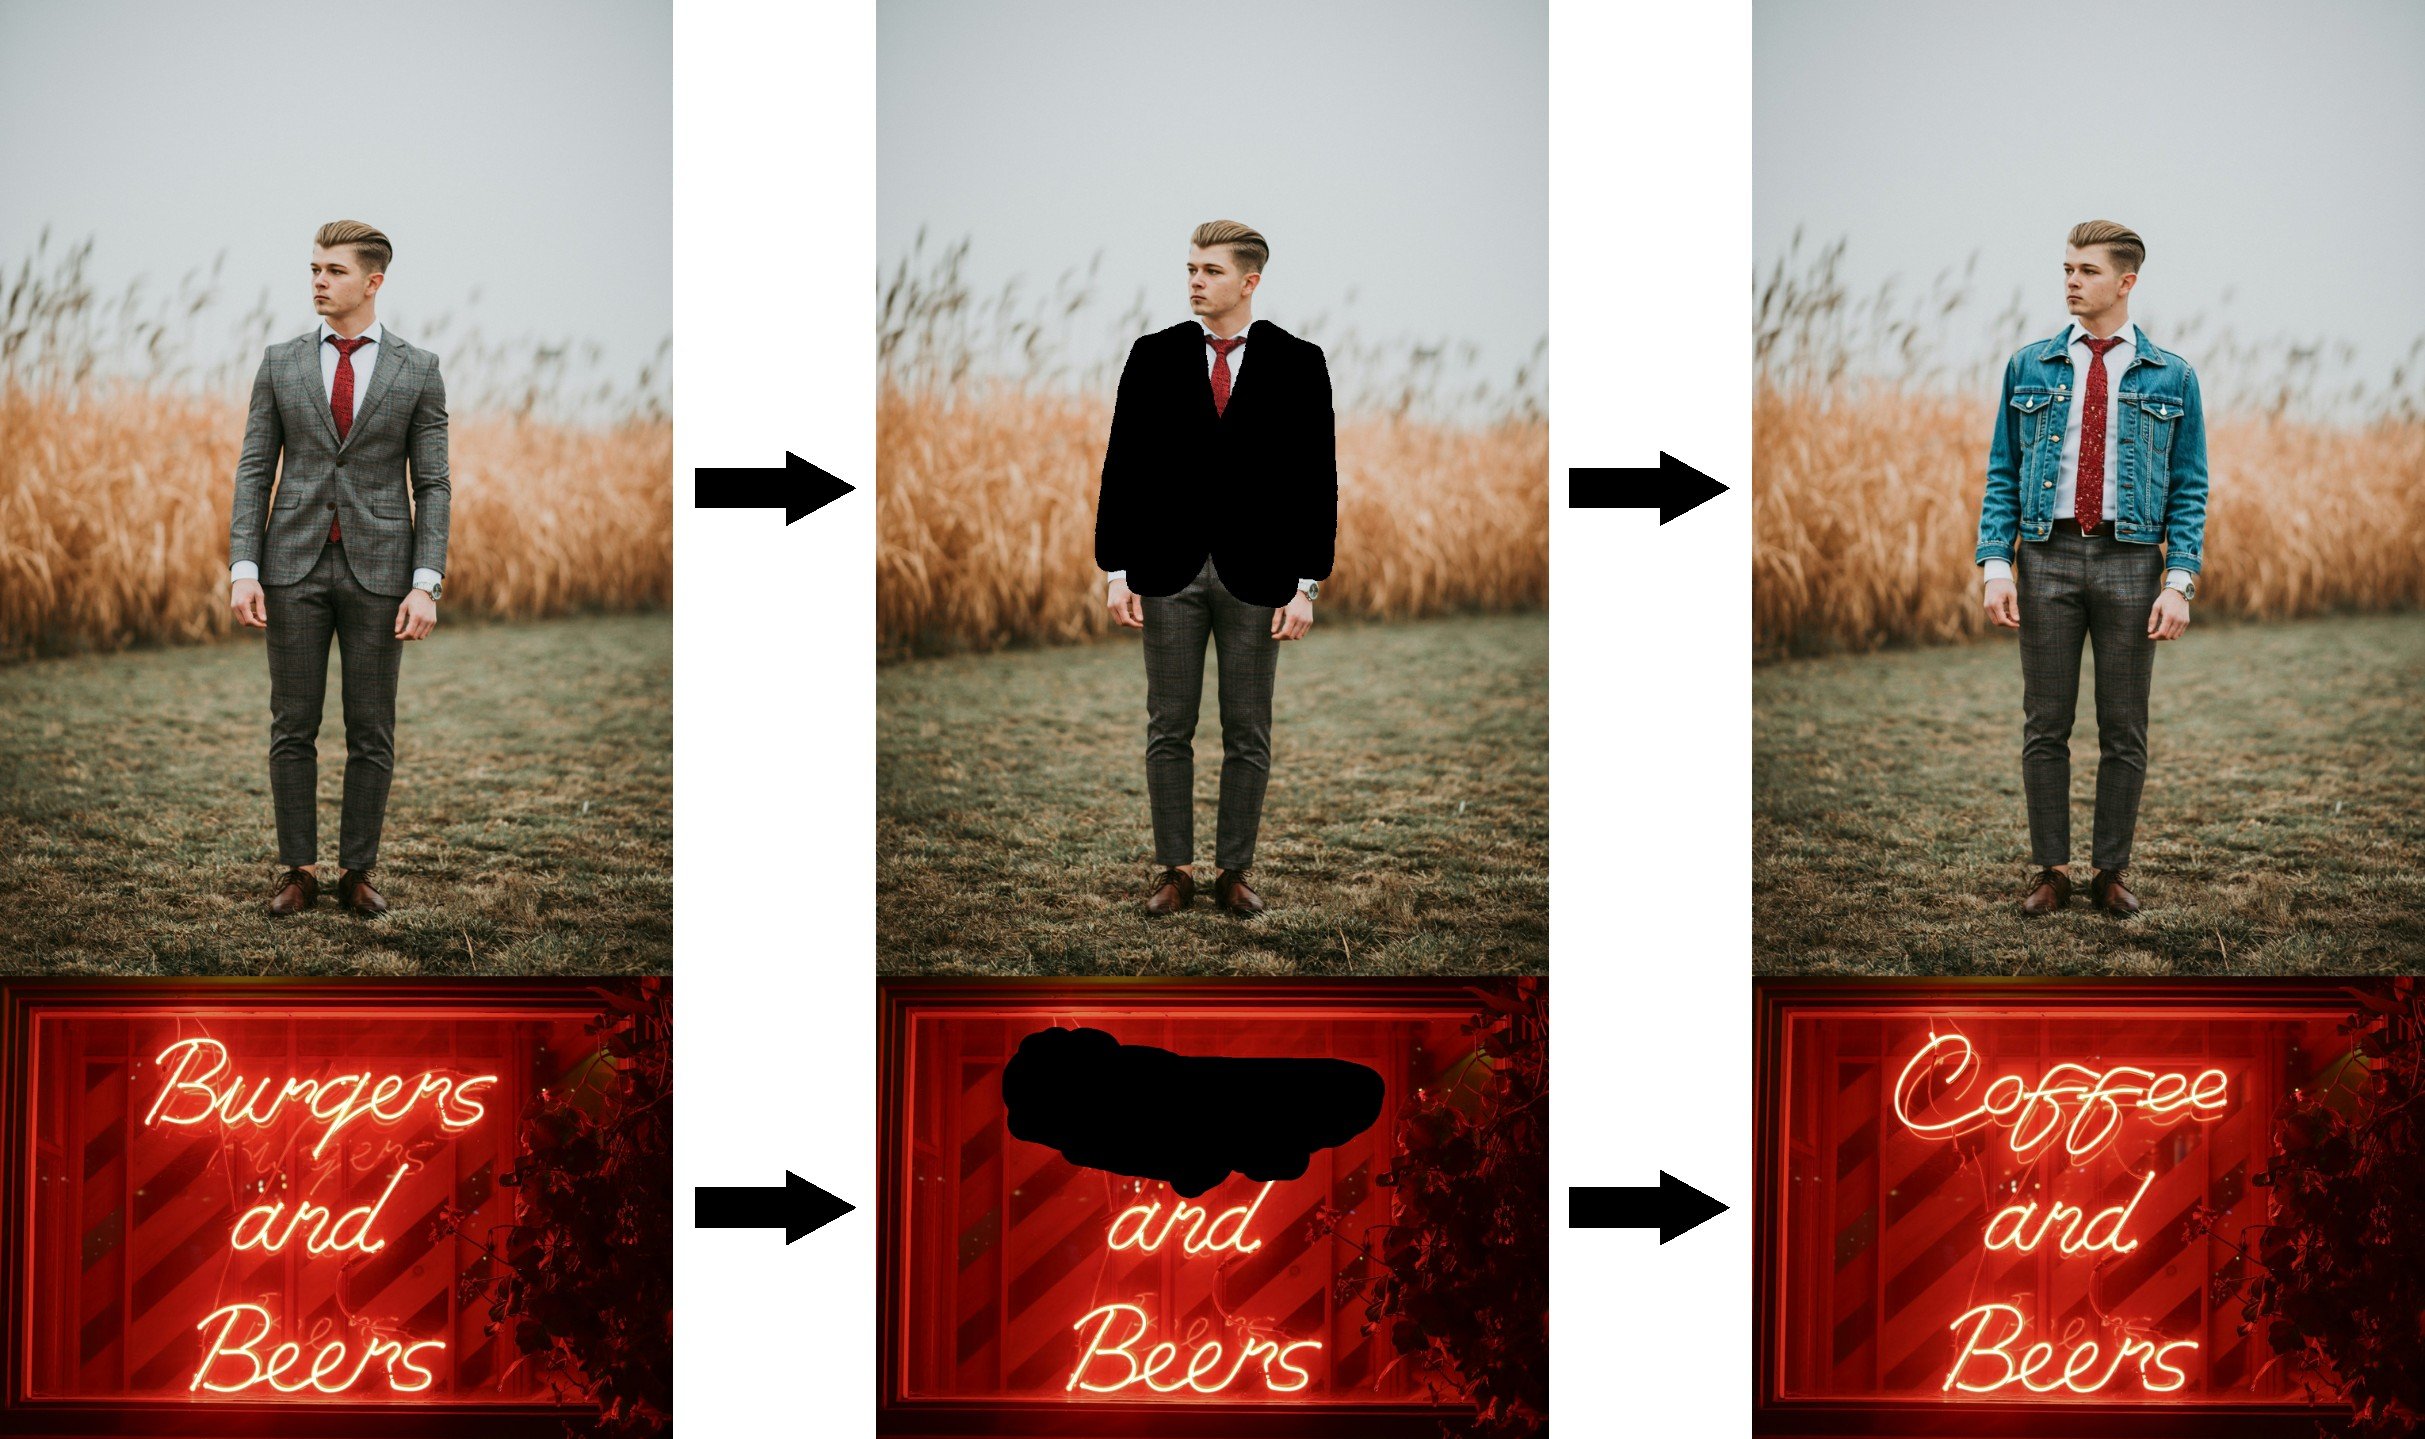
 ## Flux.1 fill dev 모델 소개
Flux.1 fill dev는 [Black Forest Labs](https://blackforestlabs.ai/)가 출시한 [FLUX.1 도구 스위트](https://blackforestlabs.ai/flux-1-tools/)의 핵심 도구 중 하나로, 이미지 인페인팅과 아웃페인팅을 위해 특별히 설계되었습니다.
Flux.1 fill dev의 주요 특징:
* 강력한 이미지 인페인팅 및 아웃페인팅 기능으로, 결과물은 상용 버전 FLUX.1 Fill \[pro]에 뒤지지 않습니다.
* 훌륭한 프롬프트 이해 및 준수 능력으로 사용자의 의도를 정확히 포착하며 원본 이미지와 높은 일관성을 유지합니다.
* 고급 가이드 디스틸레이션 훈련 기술을 통해 모델을 더욱 효율적으로 만들면서도 고품질의 출력을 유지합니다.
* 친절한 라이선스 조건으로, 생성된 결과물을 개인적, 과학적, 상업적 목적으로 사용할 수 있습니다. 자세한 내용은 [FLUX.1 \[dev\] 비상업적 라이선스](https://huggingface.co/black-forest-labs/FLUX.1-dev/blob/main/LICENSE.md)를 참조하십시오.
오픈소스 저장소: [FLUX.1 \[dev\]](https://huggingface.co/black-forest-labs/FLUX.1-dev)
이 가이드에서는 Flux.1 fill dev 모델을 기반으로 한 인페인팅 및 아웃페인팅 워크플로우를 시연합니다.
인페인팅과 아웃페인팅 워크플로우에 익숙하지 않다면, 관련 설명을 보려면 [ComfyUI 레이아웃 인페인팅 예제](/ko/tutorials/basic/inpaint)와 [ComfyUI 이미지 확장 예제](/ko/tutorials/basic/outpaint)를 참고하세요.
## Flux.1 Fill dev 및 관련 모델 설치
시작하기 전에 Flux.1 Fill dev 모델 파일의 설치를 완료합시다. 인페인팅과 아웃페인팅 워크플로우는 정확히 동일한 모델 파일을 사용합니다.
이전에 [Flux.1 텍스트 투 이미지 워크플로우](/ko/tutorials/flux/flux-1-text-to-image)의 정식 버전을 사용했다면,
이 섹션에서 **flux1-fill-dev.safetensors** 모델 파일만 다운로드하면 됩니다.
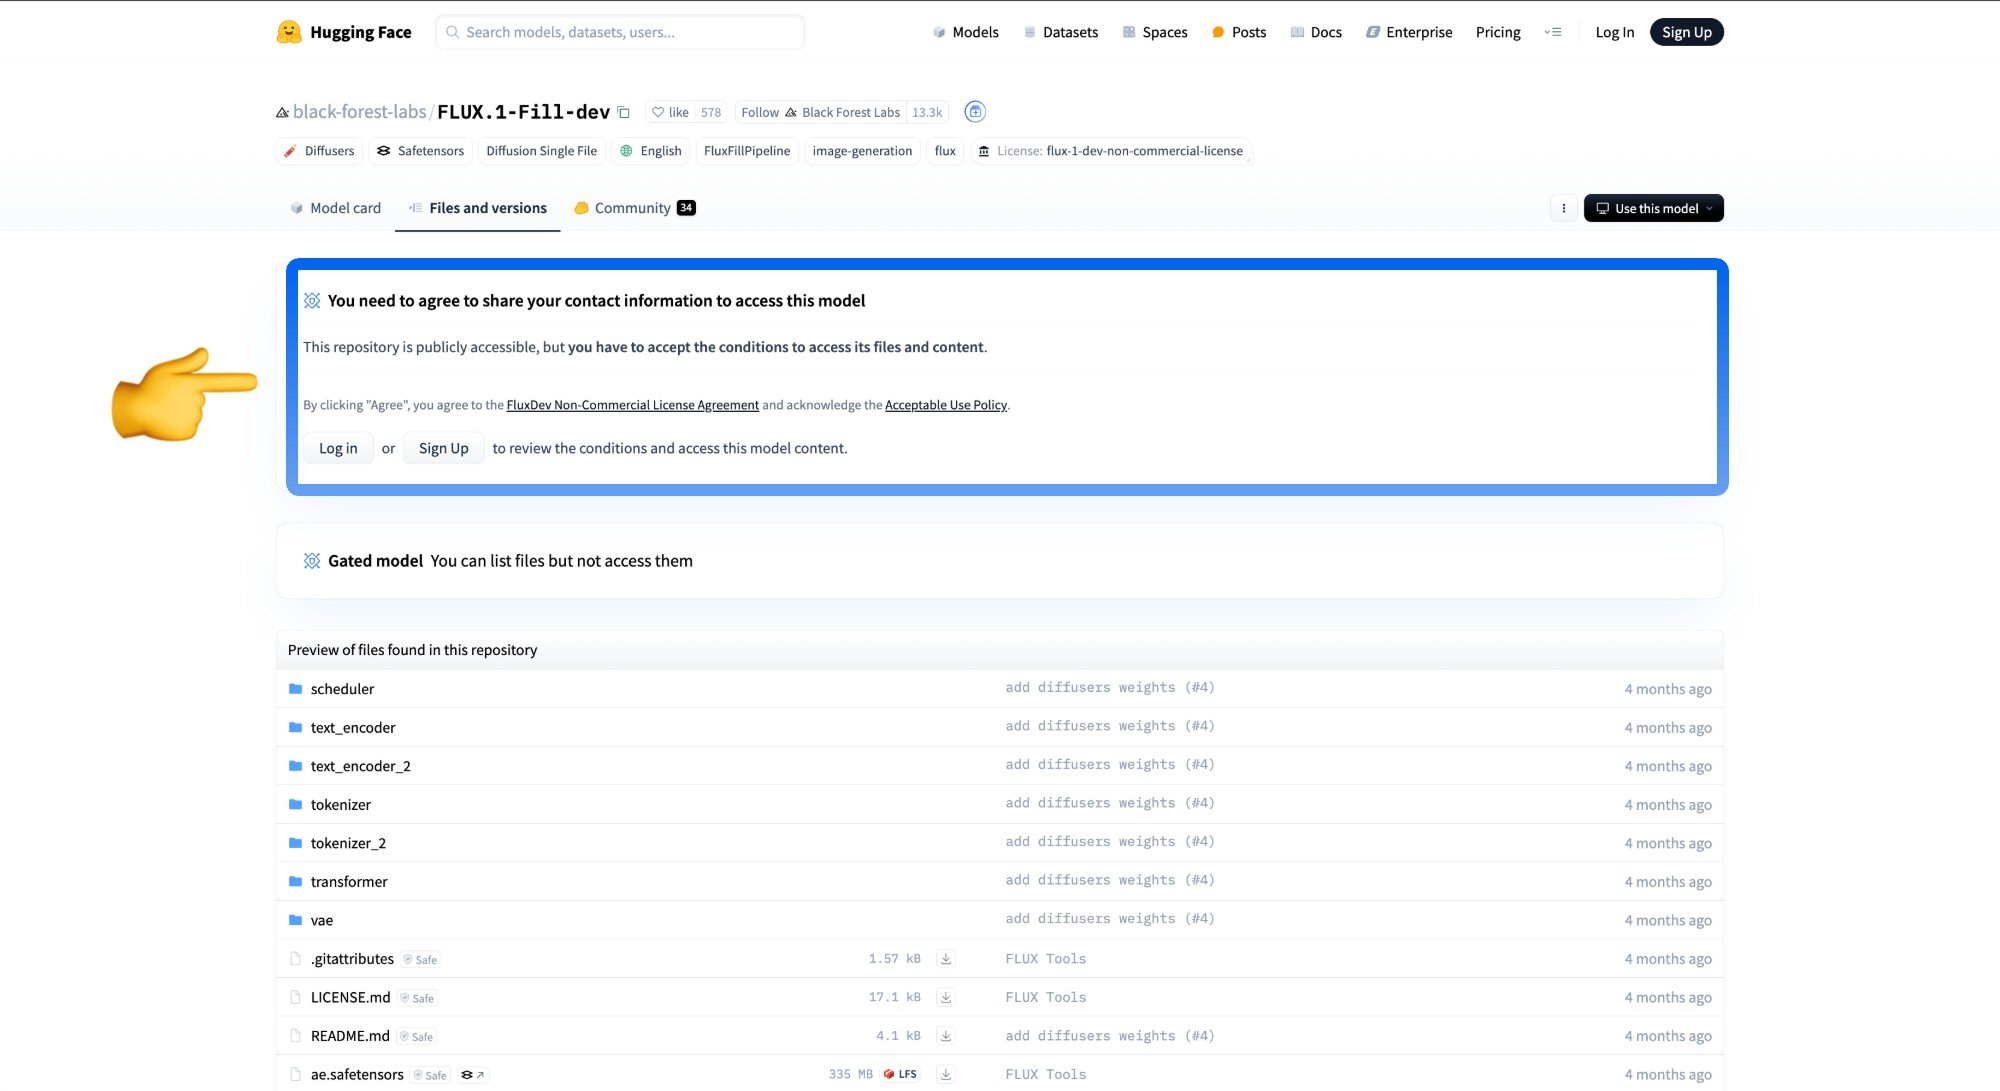
그러나 해당 모델을 다운로드하려면 해당 이용 약정에 동의해야 하므로, [black-forest-labs/FLUX.1-Fill-dev](https://huggingface.co/black-forest-labs/FLUX.1-Fill-dev) 페이지를 방문하여 아래 이미지와 같이 해당 약정에 동의했는지 확인하십시오.
## Flux.1 fill dev 모델 소개
Flux.1 fill dev는 [Black Forest Labs](https://blackforestlabs.ai/)가 출시한 [FLUX.1 도구 스위트](https://blackforestlabs.ai/flux-1-tools/)의 핵심 도구 중 하나로, 이미지 인페인팅과 아웃페인팅을 위해 특별히 설계되었습니다.
Flux.1 fill dev의 주요 특징:
* 강력한 이미지 인페인팅 및 아웃페인팅 기능으로, 결과물은 상용 버전 FLUX.1 Fill \[pro]에 뒤지지 않습니다.
* 훌륭한 프롬프트 이해 및 준수 능력으로 사용자의 의도를 정확히 포착하며 원본 이미지와 높은 일관성을 유지합니다.
* 고급 가이드 디스틸레이션 훈련 기술을 통해 모델을 더욱 효율적으로 만들면서도 고품질의 출력을 유지합니다.
* 친절한 라이선스 조건으로, 생성된 결과물을 개인적, 과학적, 상업적 목적으로 사용할 수 있습니다. 자세한 내용은 [FLUX.1 \[dev\] 비상업적 라이선스](https://huggingface.co/black-forest-labs/FLUX.1-dev/blob/main/LICENSE.md)를 참조하십시오.
오픈소스 저장소: [FLUX.1 \[dev\]](https://huggingface.co/black-forest-labs/FLUX.1-dev)
이 가이드에서는 Flux.1 fill dev 모델을 기반으로 한 인페인팅 및 아웃페인팅 워크플로우를 시연합니다.
인페인팅과 아웃페인팅 워크플로우에 익숙하지 않다면, 관련 설명을 보려면 [ComfyUI 레이아웃 인페인팅 예제](/ko/tutorials/basic/inpaint)와 [ComfyUI 이미지 확장 예제](/ko/tutorials/basic/outpaint)를 참고하세요.
## Flux.1 Fill dev 및 관련 모델 설치
시작하기 전에 Flux.1 Fill dev 모델 파일의 설치를 완료합시다. 인페인팅과 아웃페인팅 워크플로우는 정확히 동일한 모델 파일을 사용합니다.
이전에 [Flux.1 텍스트 투 이미지 워크플로우](/ko/tutorials/flux/flux-1-text-to-image)의 정식 버전을 사용했다면,
이 섹션에서 **flux1-fill-dev.safetensors** 모델 파일만 다운로드하면 됩니다.
그러나 해당 모델을 다운로드하려면 해당 이용 약정에 동의해야 하므로, [black-forest-labs/FLUX.1-Fill-dev](https://huggingface.co/black-forest-labs/FLUX.1-Fill-dev) 페이지를 방문하여 아래 이미지와 같이 해당 약정에 동의했는지 확인하십시오.
 완성된 모델 목록:
* [clip\_l.safetensors](https://huggingface.co/comfyanonymous/flux_text_encoders/resolve/main/clip_l.safetensors?download=true)
* [t5xxl\_fp16.safetensors](https://huggingface.co/comfyanonymous/flux_text_encoders/resolve/main/t5xxl_fp16.safetensors?download=true)
* [ae.safetensors](https://huggingface.co/black-forest-labs/FLUX.1-schnell/resolve/main/ae.safetensors?download=true)
* [flux1-fill-dev.safetensors](https://huggingface.co/black-forest-labs/FLUX.1-Fill-dev/resolve/main/flux1-fill-dev.safetensors?download=true)
파일 저장 위치:
```
ComfyUI/
├── models/
│ ├── text_encoders/
│ │ ├── clip_l.safetensors
│ │ └── t5xxl_fp16.safetensors
│ ├── vae/
│ │ └── ae.safetensors
│ └── diffusion_models/
│ └── flux1-fill-dev.safetensors
```
## Flux.1 Fill dev 인페인팅 워크플로우
### 1. 인페인팅 워크플로우 및 자산
완성된 모델 목록:
* [clip\_l.safetensors](https://huggingface.co/comfyanonymous/flux_text_encoders/resolve/main/clip_l.safetensors?download=true)
* [t5xxl\_fp16.safetensors](https://huggingface.co/comfyanonymous/flux_text_encoders/resolve/main/t5xxl_fp16.safetensors?download=true)
* [ae.safetensors](https://huggingface.co/black-forest-labs/FLUX.1-schnell/resolve/main/ae.safetensors?download=true)
* [flux1-fill-dev.safetensors](https://huggingface.co/black-forest-labs/FLUX.1-Fill-dev/resolve/main/flux1-fill-dev.safetensors?download=true)
파일 저장 위치:
```
ComfyUI/
├── models/
│ ├── text_encoders/
│ │ ├── clip_l.safetensors
│ │ └── t5xxl_fp16.safetensors
│ ├── vae/
│ │ └── ae.safetensors
│ └── diffusion_models/
│ └── flux1-fill-dev.safetensors
```
## Flux.1 Fill dev 인페인팅 워크플로우
### 1. 인페인팅 워크플로우 및 자산
워크플로우 이미지 다운로드
Comfy Cloud에서 실행
아래 이미지를 다운로드해 ComfyUI로 드래그하여 해당 워크플로우를 로드하세요.  아래 이미지를 다운로드해 입력 이미지로 사용하겠습니다. 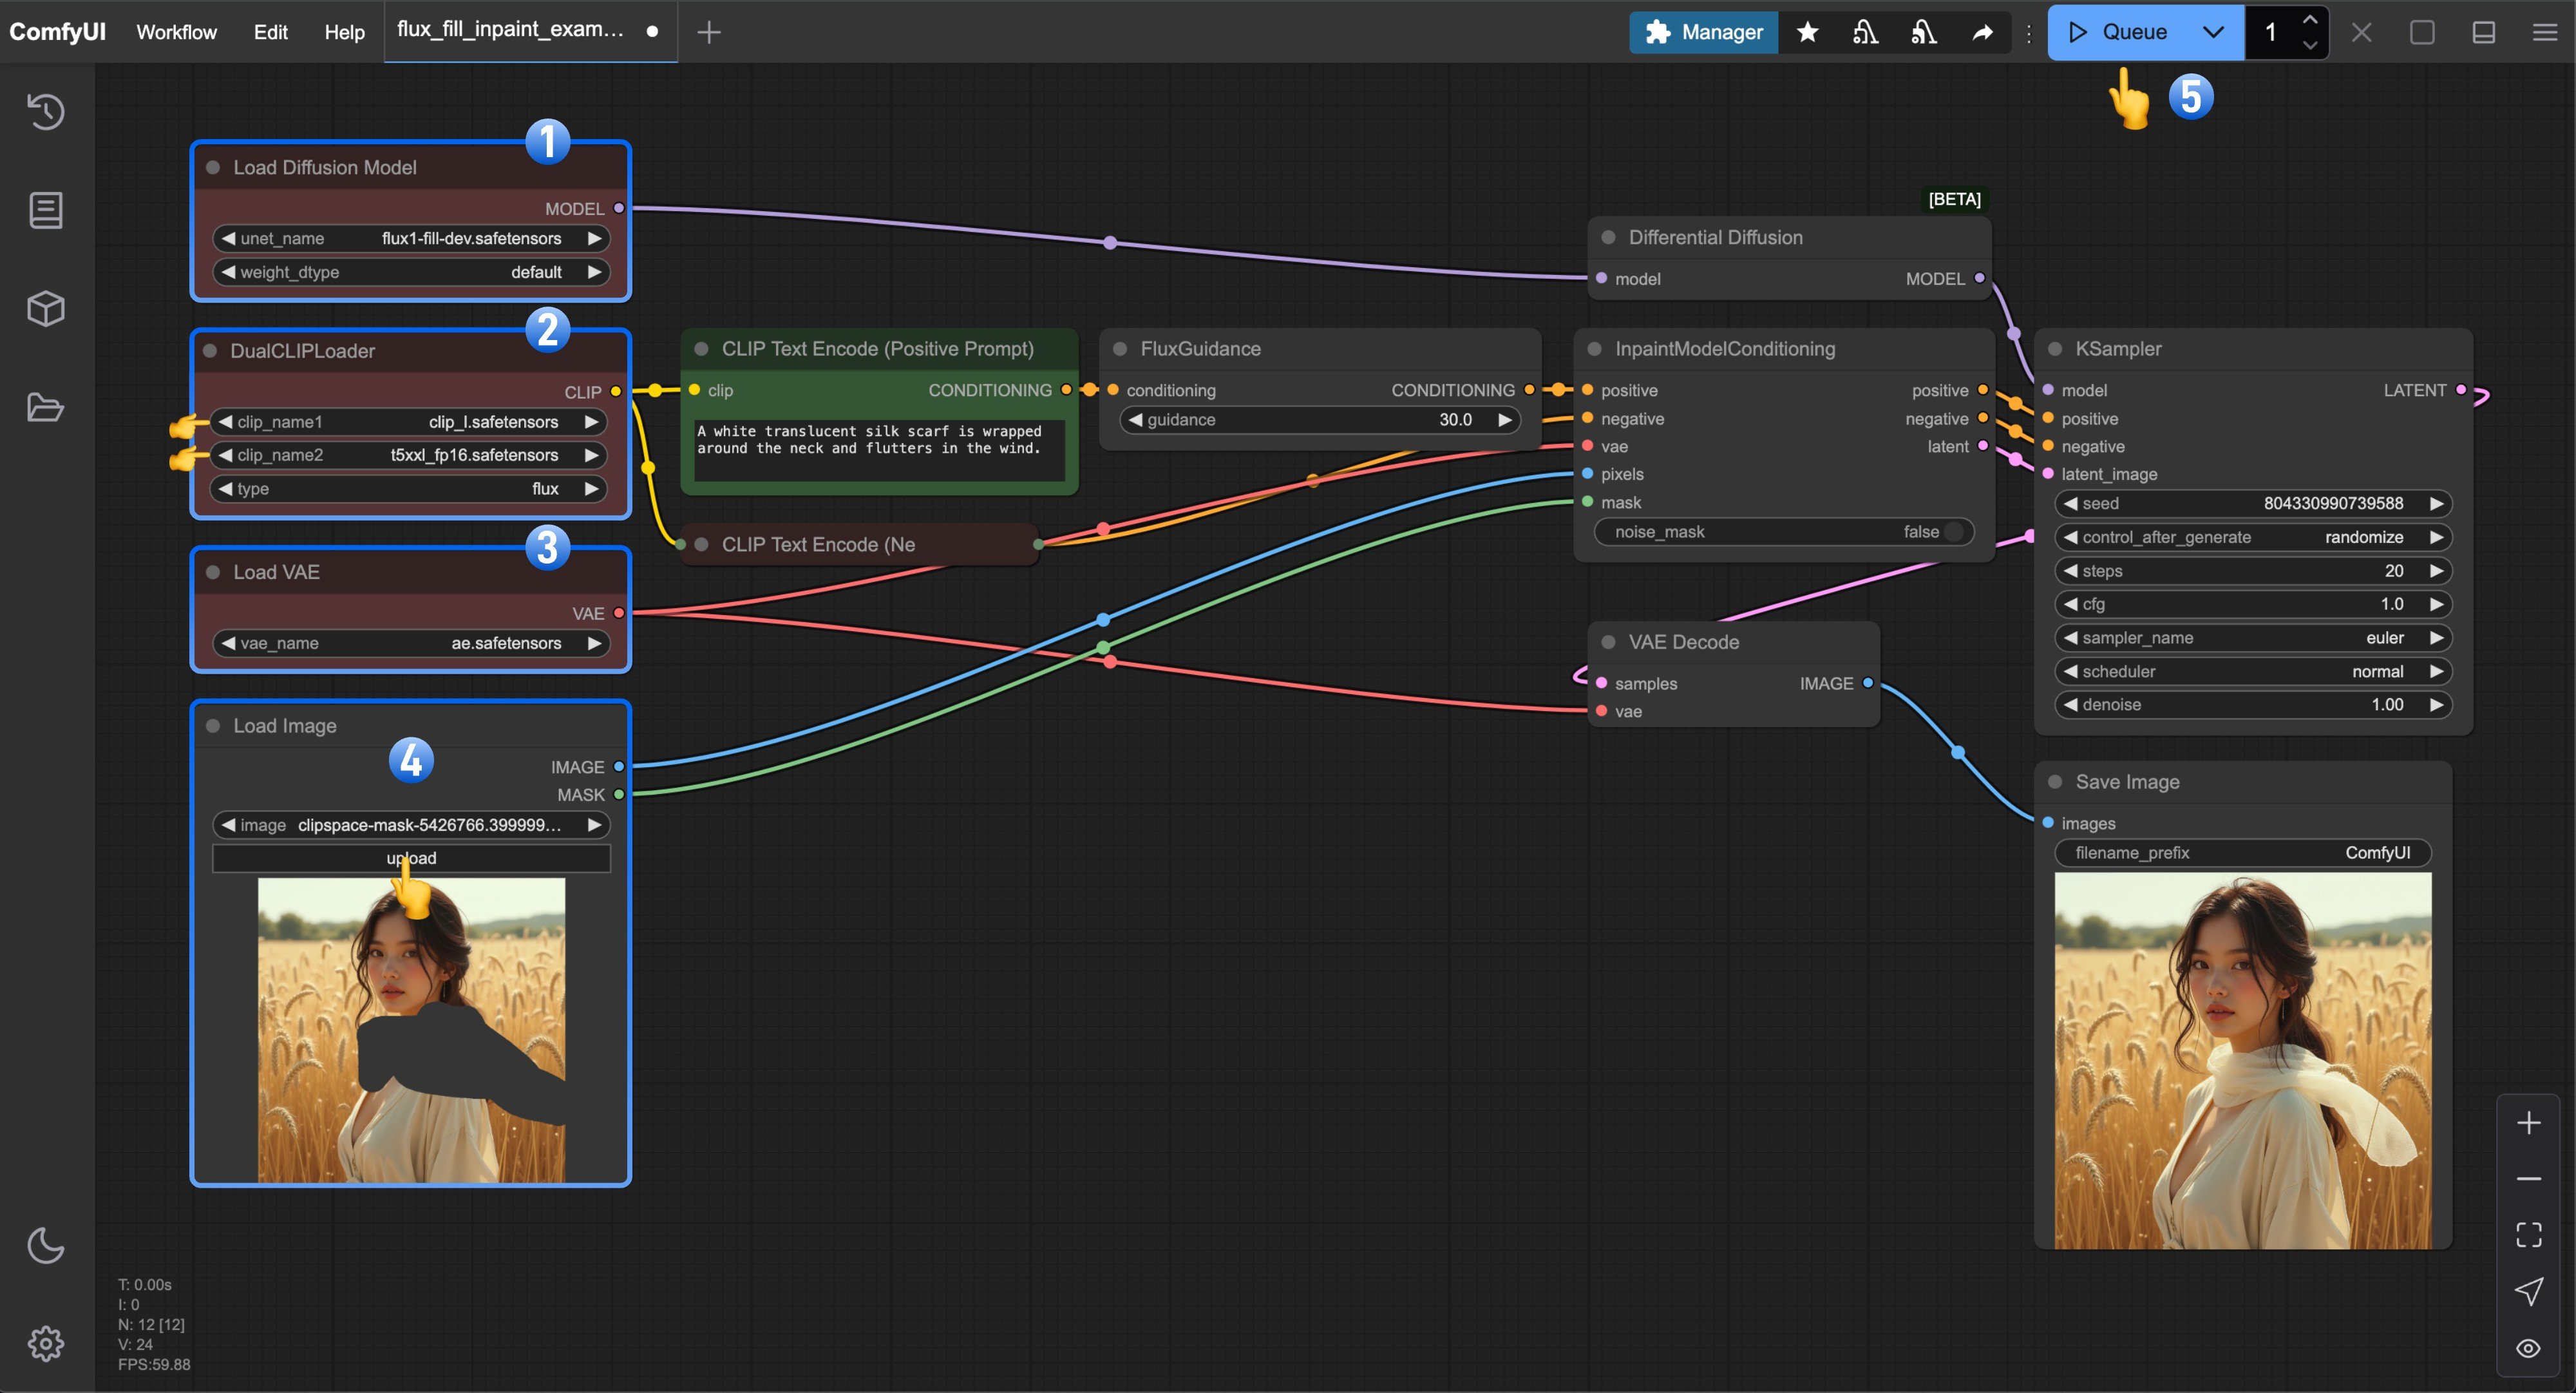 1. `Load Diffusion Model` 노드가 `flux1-fill-dev.safetensors`를 로드했는지 확인하세요.
2. `DualCLIPLoader` 노드가 다음 모델들을 로드했는지 확인하세요:
* clip\_name1: `t5xxl_fp16.safetensors`
* clip\_name2: `clip_l.safetensors`
3. `Load VAE` 노드가 `ae.safetensors`를 로드했는지 확인하세요.
4. 문서에 제공된 입력 이미지를 `Load Image` 노드에 업로드하세요; 마스크가 없는 버전을 사용한다면 마스크 에디터를 이용해 마스크를 완성하는 것을 잊지 마세요.
5. `Queue` 버튼을 클릭하거나 단축키 `Ctrl(cmd) + Enter`를 사용해 워크플로우를 실행하세요.
## Flux.1 Fill dev 아웃페인팅 워크플로우
1. `Load Diffusion Model` 노드가 `flux1-fill-dev.safetensors`를 로드했는지 확인하세요.
2. `DualCLIPLoader` 노드가 다음 모델들을 로드했는지 확인하세요:
* clip\_name1: `t5xxl_fp16.safetensors`
* clip\_name2: `clip_l.safetensors`
3. `Load VAE` 노드가 `ae.safetensors`를 로드했는지 확인하세요.
4. 문서에 제공된 입력 이미지를 `Load Image` 노드에 업로드하세요; 마스크가 없는 버전을 사용한다면 마스크 에디터를 이용해 마스크를 완성하는 것을 잊지 마세요.
5. `Queue` 버튼을 클릭하거나 단축키 `Ctrl(cmd) + Enter`를 사용해 워크플로우를 실행하세요.
## Flux.1 Fill dev 아웃페인팅 워크플로우

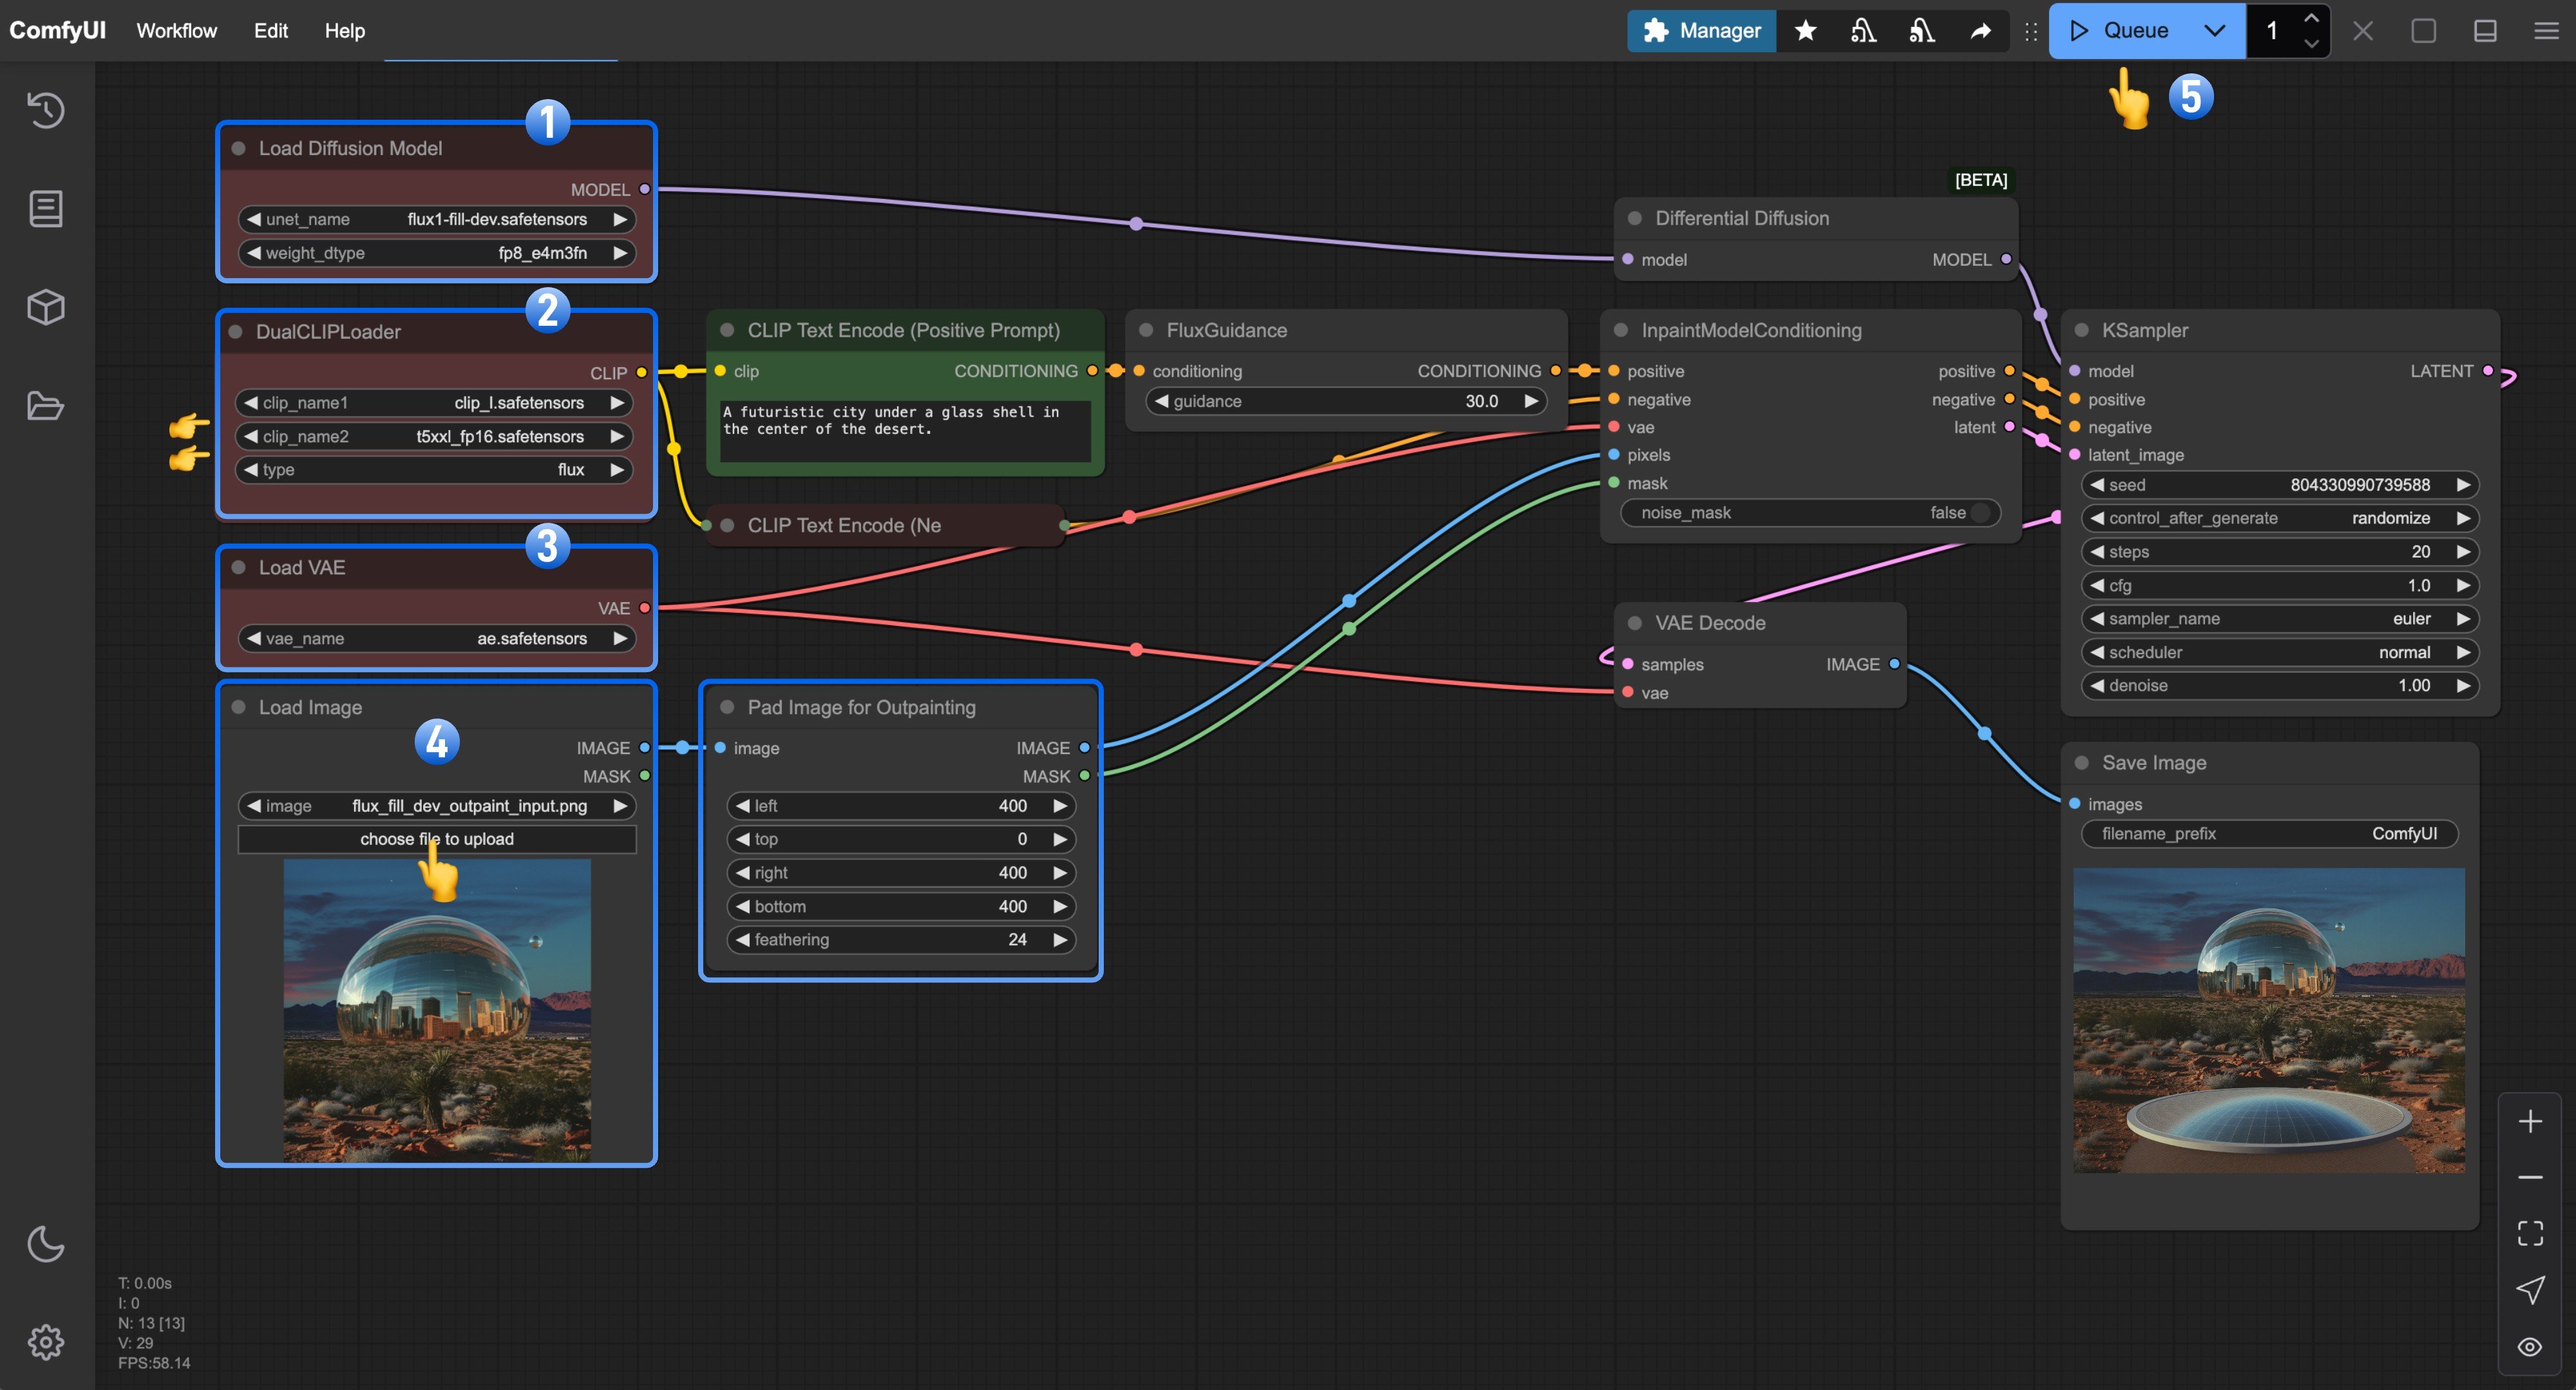 1. `Load Diffusion Model` 노드가 `flux1-fill-dev.safetensors`를 로드했는지 확인하세요.
2. `DualCLIPLoader` 노드가 다음 모델들을 로드했는지 확인하세요:
* clip\_name1: `t5xxl_fp16.safetensors`
* clip\_name2: `clip_l.safetensors`
3. `Load VAE` 노드가 `ae.safetensors`를 로드했는지 확인하세요.
4. 문서에 제공된 입력 이미지를 `Load Image` 노드에 업로드하세요.
5. `Queue` 버튼을 클릭하거나 단축키 `Ctrl(cmd) + Enter`를 사용해 워크플로우를 실행하세요.
1. `Load Diffusion Model` 노드가 `flux1-fill-dev.safetensors`를 로드했는지 확인하세요.
2. `DualCLIPLoader` 노드가 다음 모델들을 로드했는지 확인하세요:
* clip\_name1: `t5xxl_fp16.safetensors`
* clip\_name2: `clip_l.safetensors`
3. `Load VAE` 노드가 `ae.safetensors`를 로드했는지 확인하세요.
4. 문서에 제공된 입력 이미지를 `Load Image` 노드에 업로드하세요.
5. `Queue` 버튼을 클릭하거나 단축키 `Ctrl(cmd) + Enter`를 사용해 워크플로우를 실행하세요.